
15 DIY Holiday Decor Ideas You Can Make in an Afternoon
Introduction
The best DIY holiday decor ideas are the ones you can actually finish before dinner. You do not need a craft room, a big budget, or a whole weekend to make your home feel festive — you need one free afternoon, a few simple supplies, and projects that forgive a beginner’s hand. Every idea in this guide fits that test: it takes between fifteen minutes and three hours, costs under thirty dollars, and uses materials you can find at a craft store, a grocery store, or your own kitchen cupboard.
Holiday decorating works best when it feels handmade rather than store-bought, and that is exactly what these projects deliver. Paper snowflakes on a window, dried orange garlands across a mantel, cinnamon candles on a table — each one adds warmth and personality that no plastic decoration from a big-box store can match. The projects below are ordered from the quickest wins to the slightly more involved centerpieces, so you can start with a ten-minute success and keep going while the mood lasts. If you are working in a small space, the holiday living room decor ideas that work in small spaces pair beautifully with the crafts here, and if you want more weekend-sized projects, these easy DIY home decor ideas you can finish in a weekend are the natural next step.
Before you start, gather the basics in one place: scissors, a glue gun, twine, a few rolls of ribbon, and a tray or old sheet to catch the mess. Most of the projects below share these supplies, so one small shopping trip covers nearly the whole list. Work on a clear table, keep a bin nearby for scraps, and finish each project completely before starting the next — a finished garland on the mantel beats three half-finished crafts on the table every time.
1. Paper Snowflake Window Display

Paper snowflakes are the fastest holiday craft in existence, and done well they look far better than their humble materials suggest. Fold a square of white paper into triangles, cut small notches and curves along the folded edges, and unfold to reveal a pattern no two snowflakes share. Make them in three sizes — large for the centre of the window, medium for the sides, small to fill the gaps — and tape them to the glass with small loops of clear tape so the winter light shines through the cutouts.
The trick to a display that looks intentional rather than random is spacing: cluster the flakes in groups of three or five, vary the sizes inside each cluster, and leave some bare glass between the groups so the eye can rest. If you want a softer look, use white tissue paper instead of printer paper — it catches the light like frost. This is also the ideal first project if you are decorating with children, because every snowflake turns out beautiful and the whole window takes less than half an hour.
2. Dried Orange Slice Garland

A dried orange slice garland brings colour, scent, and a warm glow to any room, and it costs almost nothing to make. Slice oranges thinly, about five millimetres thick, and dry them in a low oven for two to three hours, flipping once, until the edges curl slightly and the centres turn translucent gold. Thread the slices onto twine with a large needle, alternating them with cinnamon sticks, wooden beads, and sprigs of dried greenery, then hang the finished garland across a mantel, a window, or a doorway.
The garland looks best when the slices are spaced evenly but not rigidly — leave a finger’s width between each piece and let the twine sag gently in the middle. If you are short on time, buy pre-dried orange slices from a craft store and skip the oven entirely; the threading takes twenty minutes. Keep the garland away from steam and damp, and it will look good for the whole season, filling the room with a faint citrus scent every time the heating comes on.
3. Mason Jar Snow Globe Luminaries

Mason jar snow globes turn a kitchen staple into the cosiest light in the house. Fill a clean mason jar a third full with fake snow or white glitter, add a small bottle-brush tree or a tiny ceramic house, then screw the lid on tight and set a battery tea light underneath or behind the jar. The light catches the glitter and the little scene inside, and the whole jar glows like a miniature winter world.
Make three jars at different heights — one tall, one medium, one short — and group them on a mantel or a windowsill for a display that looks deliberately styled. For a more grown-up version, skip the glitter and use plain white sand with a sprig of rosemary tucked inside; the effect is quieter but just as festive. Use battery candles only, never real flames inside a sealed jar, and keep the jars where they can be admired without being knocked over.
DIY Holiday Decor Quick-Start Checklist
- ✅ Gather shared supplies first: scissors, glue gun, twine, ribbon, and a drop cloth
- ✅ Finish one project completely before starting the next
- ✅ Use battery candles inside jars, wreaths, and anything flammable
- ✅ Dry orange slices fully before threading so the garland does not go sticky
- ✅ Test glue-gun joins on a scrap piece before committing to the real one
- ✅ Photograph each finished project in place so you can repeat the layout next year
- ✅ Store leftover supplies in one labelled box so next December starts in minutes
4. Pinecone Christmas Tree Centerpiece
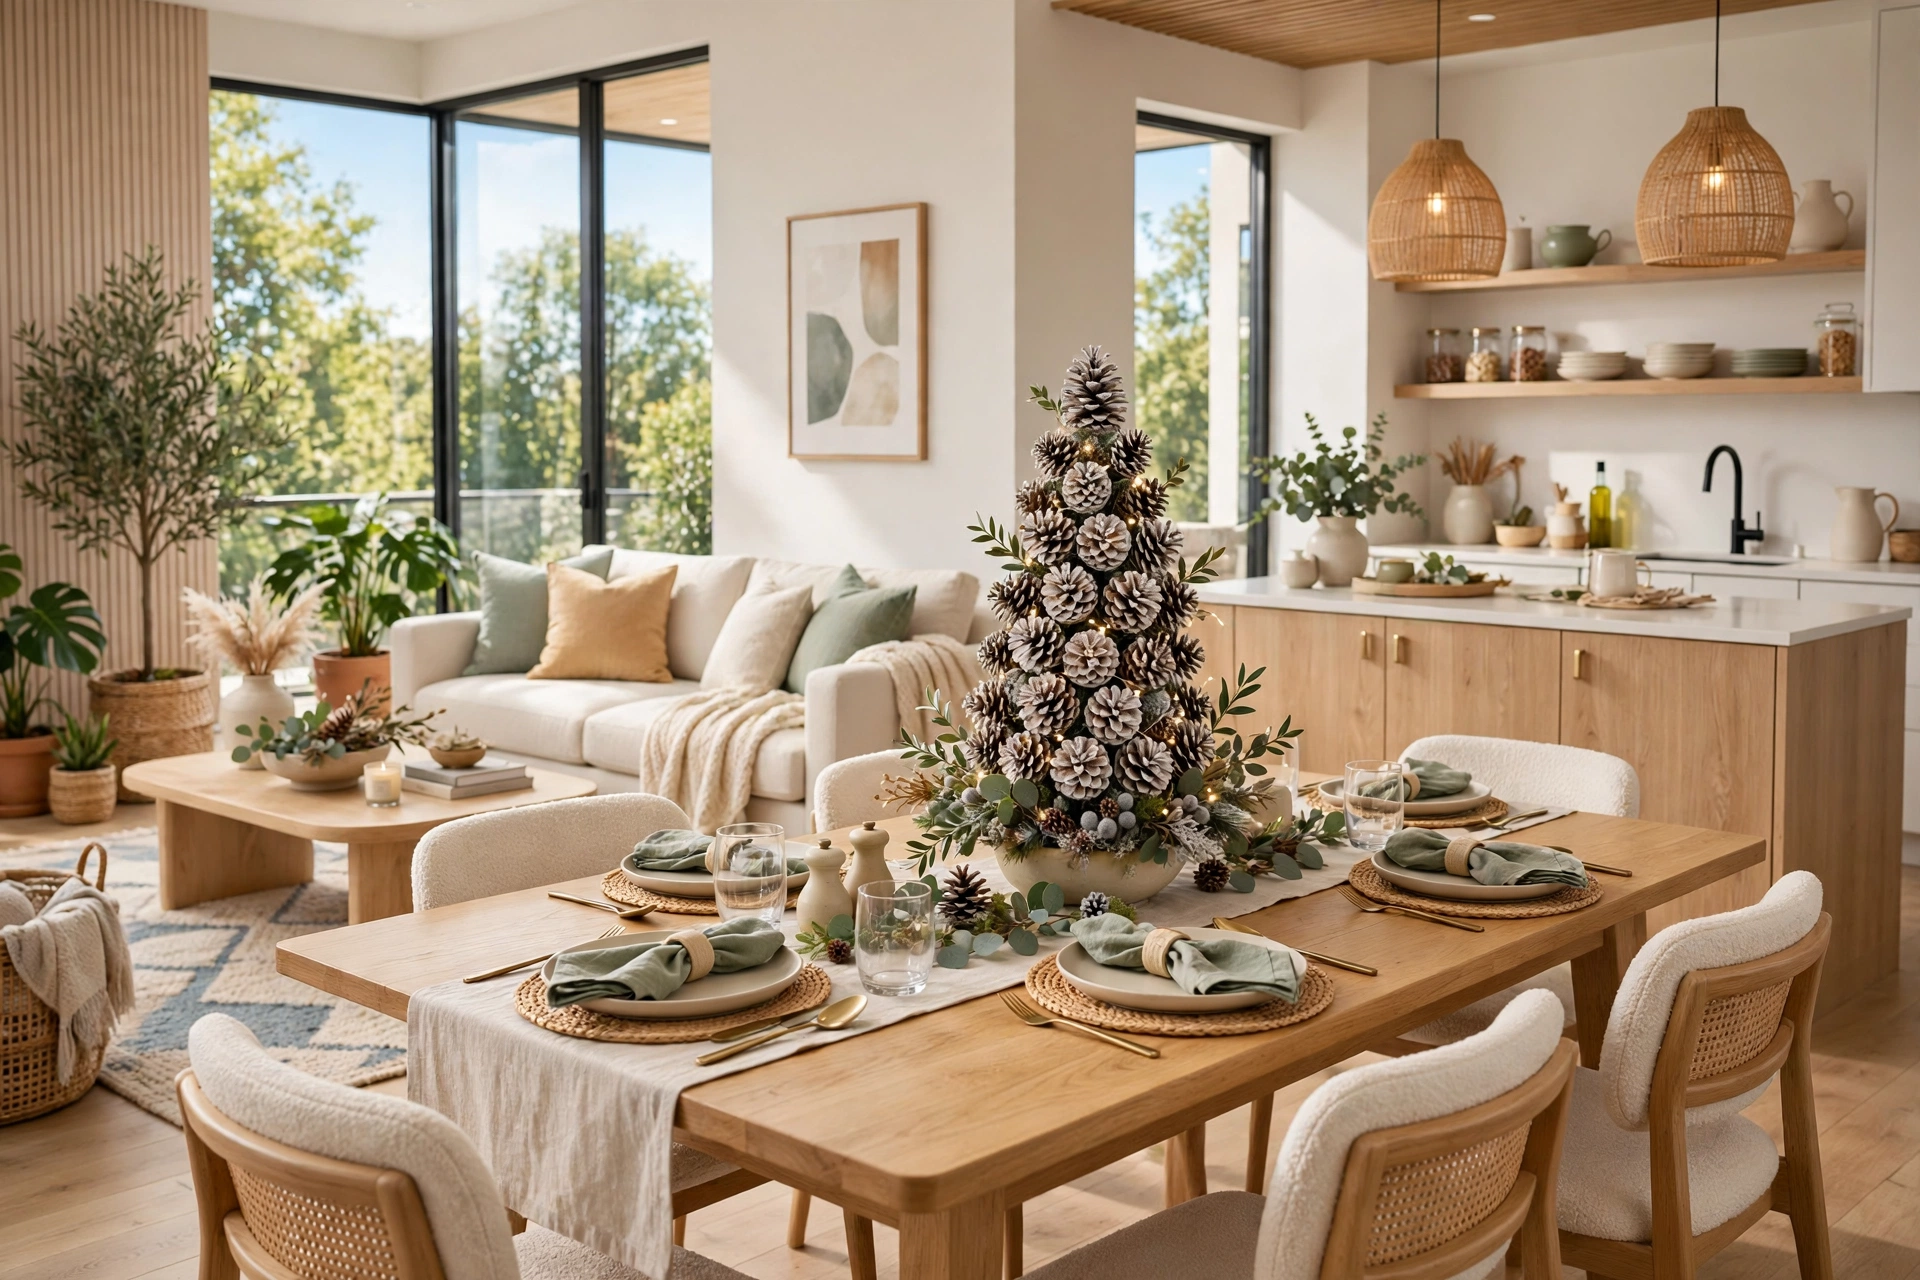
A pinecone Christmas tree is the centrepiece that makes guests ask where you bought it. Stack pinecones in graduated sizes — large at the bottom, small at the top — gluing each layer to the one below with a hot glue gun, and finish with a tiny star or a wooden bead at the peak. A light dusting of white spray paint or fake snow on the tips gives the whole tree a frosted look, and a string of tiny battery fairy lights wound through the layers makes it glow after dark.
Choose pinecones that are dry and fully open, and bake them in a low oven for twenty minutes first to open the scales and drive out any insects. Build the tree on a wooden slice or a small plate so it has a stable base, and work slowly — let each layer set before adding the next, or the whole stack will lean. This tree survives the season on a dining table or an entryway console, and it packs away flat in a box for next year.
5. Cinnamon Stick Candle Holders

Wrapping a plain pillar candle in cinnamon sticks is a five-minute project with an outsized payoff: it looks like a boutique candle and fills the room with a warm, spicy scent as it burns. Stand cinnamon sticks vertically around the candle, holding them in place with a rubber band, then tie a length of twine or raffia over the band to hide it. Trim the sticks so their tops sit just below the candle’s rim, and set the finished candle on a wooden board or a small plate.
Buy cinnamon sticks in bulk bags from a spice supplier rather than small jars — the price difference is enormous, and one bag covers the candle holders, the garland, and the simmer pots. The scent is strongest when the candle is lit, as the warmth releases the cinnamon oils, so this is the project to make for the dining table or the living room, where you actually sit in the evening. Never leave a burning candle unattended, and keep the flame well above the sticks by using a tall pillar candle.
💡 Pro Tip: Buy cinnamon sticks, twine, dried oranges, and ribbon in bulk at the start of December. One shopping trip covers the candle holders, the garland, the simmer pots, and the gift jars — and costs less than a single store-bought holiday candle.
Quick Comparison: DIY Holiday Decor by Cost and Effort
6. Handmade Paper Star Lanterns

Paper star lanterns cast the prettiest shadows of any project in this guide. Cut star shapes from sturdy card in a warm cream or deep red, score and fold them into three-dimensional stars, and glue the points together, leaving a small opening at the bottom. Slip a battery tea light inside, and the star glows from within, throwing soft star-shaped light across the wall behind it.
Make a set of five in mixed sizes and hang them at different heights from a branch, a curtain rod, or a ceiling hook, so they read as a constellation rather than a single decoration. The folding takes patience the first time, so make one practice star from scrap paper before cutting into your good card. These lanterns are light enough to hang anywhere, and they look magical in a bedroom window or above a reading chair.
7. Ribbon-and-Greenery Staircase Garland

A staircase garland is the project that makes the whole house feel decorated, because it runs through the space everyone walks past. Start with a plain faux greenery garland — or fresh pine branches if you have them — and secure it along the banister with green florist wire, letting it drape in gentle swags between each baluster. Weave in wide ribbon in a deep red or forest green, tying a large bow at each swag point, and tuck in pinecones, dried orange slices, and small battery fairy lights.
The difference between a garland that looks lush and one that looks sparse is layering: use two strands of greenery twisted together rather than one, and add the ribbon after the greenery is secure so it sits on top. Step back after every section and check the drape from the bottom of the stairs — the view from below is the one everyone actually sees. This project takes about two hours, and it transforms an ordinary staircase into the centrepiece of the house.
8. Cranberry and Candle Table Runner

A cranberry table runner is the fastest way to make a dining table look ready for a holiday dinner. Lay a length of burlap or linen down the centre of the table, scatter fresh cranberries in loose drifts along its length, and set small glass votives or pillar candles between the drifts. Add a few sprigs of fresh rosemary or pine, and the table is dressed — no sewing, no gluing, nothing permanent.
Fresh cranberries last about a week at room temperature, so make this runner the morning of a dinner rather than days ahead, and keep the candles in glass holders so the wax never touches the fabric. For a longer-lasting version, use faux cranberries and dried greenery, which look identical from across the table and survive the whole season. Either way, the contrast of deep red berries against natural burlap is the classic holiday palette, and it costs less than a single store-bought table runner.
📌 Important: Fresh cranberries stain light fabric, so always use a runner or a tray underneath them, and keep them away from white tablecloths and pale upholstery.
9. Felt Ornament Tree for the Kids’ Room
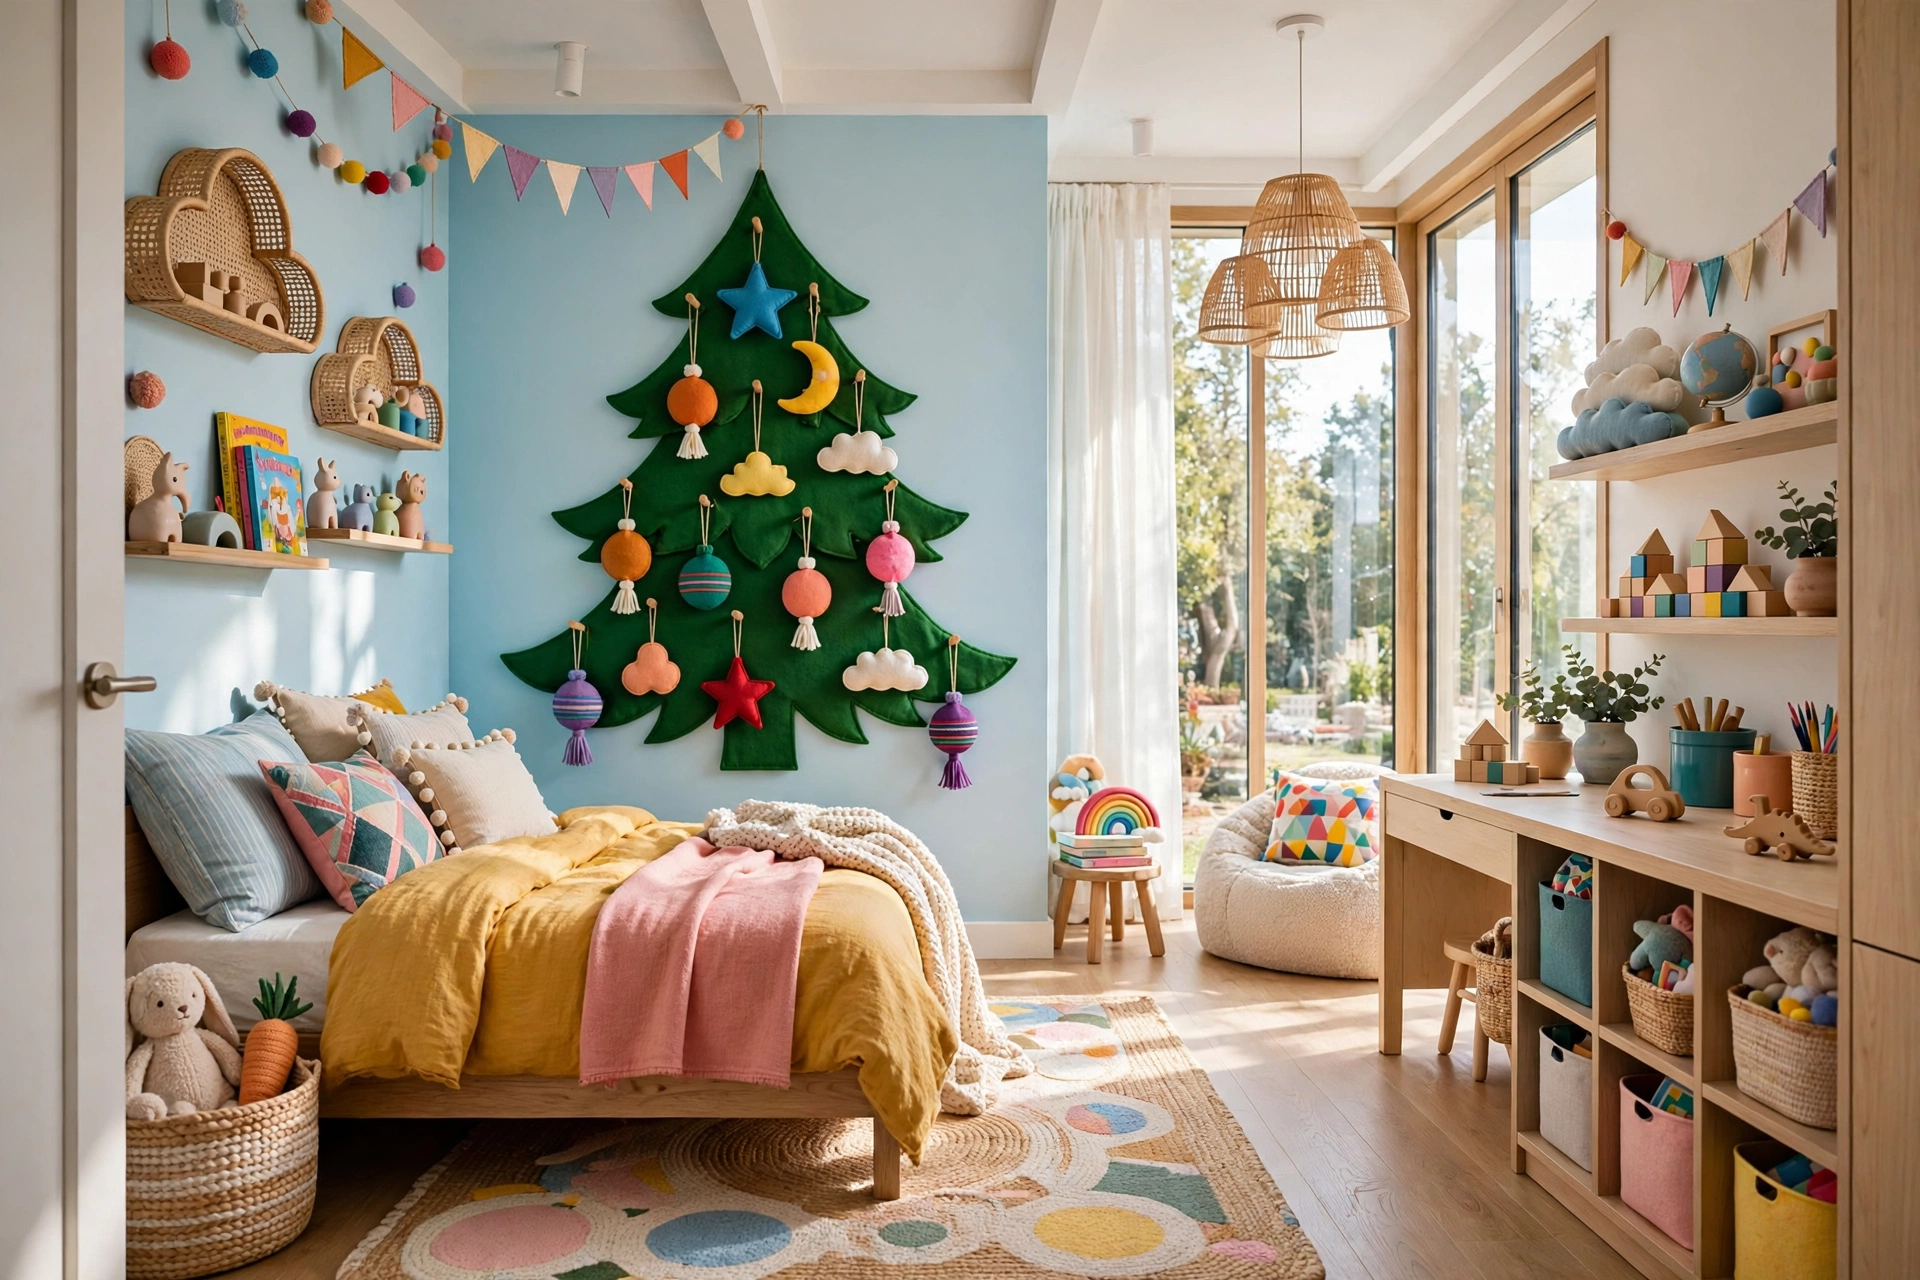
A felt ornament tree gives children their own tree to decorate — and redecorate — all season long. Cut a large tree shape from green felt and hang it on a bedroom wall or door with removable adhesive strips, then cut ornaments, stars, and a tree topper from felt in red, gold, and white. Attach small pieces of hook-and-loop tape to the back of each ornament, and the tree becomes a reusable decoration that kids can rearrange every day.
This is the project to make together: let children choose the ornament shapes and colours, and let them place everything themselves, even if the result is gloriously uneven. The felt tree keeps little hands busy and keeps the real tree’s fragile ornaments safe, and it folds flat for storage when the season ends. Make the tree at least a metre tall so there is room for a satisfying number of ornaments, and keep spare felt on hand for the inevitable lost star.
10. Holiday Simmer Pot Gift Jars

Simmer pot jars are the gift that smells like the holidays before it is even opened. Layer dried orange slices, cinnamon sticks, whole cloves, star anise, and a sprig of rosemary in a mason jar, screw the lid on, and tie a ribbon and a small handwritten tag around the neck. The tag explains the gift: empty the jar into a pot of water, simmer on low, and the whole house fills with holiday scent.
These jars cost only a few dollars each, so make a batch of six or eight in one sitting and keep them ready for neighbours, teachers, and last-minute guests. The ingredients are all dry, so the jars keep for months on a shelf, and the presentation is so pretty that no wrapping paper is needed. If you want more budget-friendly handmade ideas, the DIY room decor on a budget guide has more projects that cost almost nothing.
11. Washi Tape Holiday Wall Art
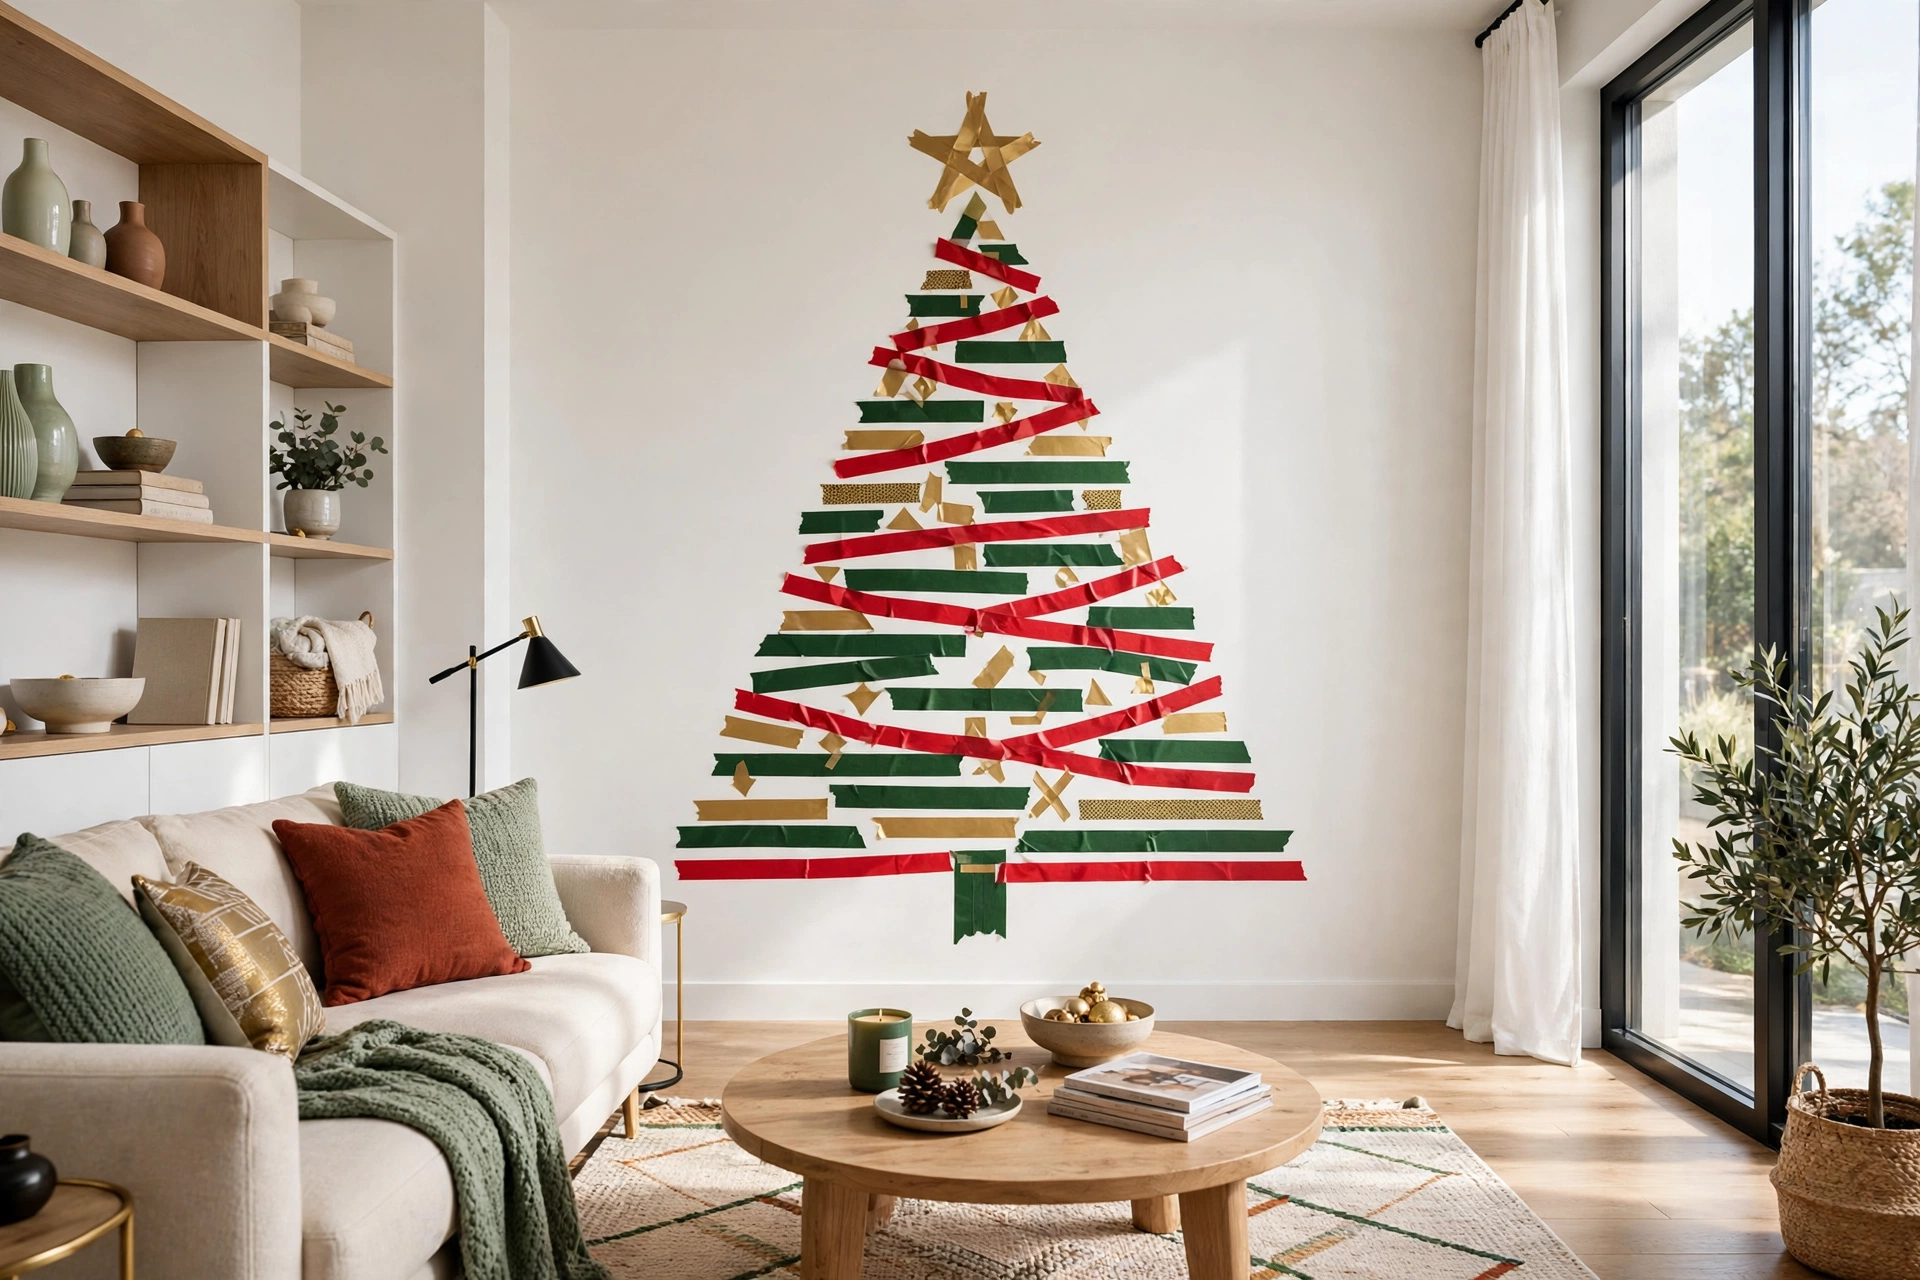
Washi tape wall art is the zero-commitment decoration: it peels off cleanly in January and leaves no marks behind. Use wide washi tape in red, green, and gold to draw a large Christmas tree shape directly on a blank wall — a triangle of horizontal stripes, a small trunk at the bottom, and a star at the top made from gold tape. Add small circles of tape as ornaments, or stick lightweight paper ornaments onto the tape stripes.
The trick is to sketch the outline lightly in pencil first, then lay the tape along the lines, smoothing each strip with a credit card to avoid bubbles. This project suits renters and anyone who does not want to hammer nails into a wall, and it works brilliantly in a child’s bedroom or a hallway that needs a festive touch. When the season ends, peel the tape off slowly from one corner and the wall is exactly as it was.
12. No-Sew Burlap Stockings
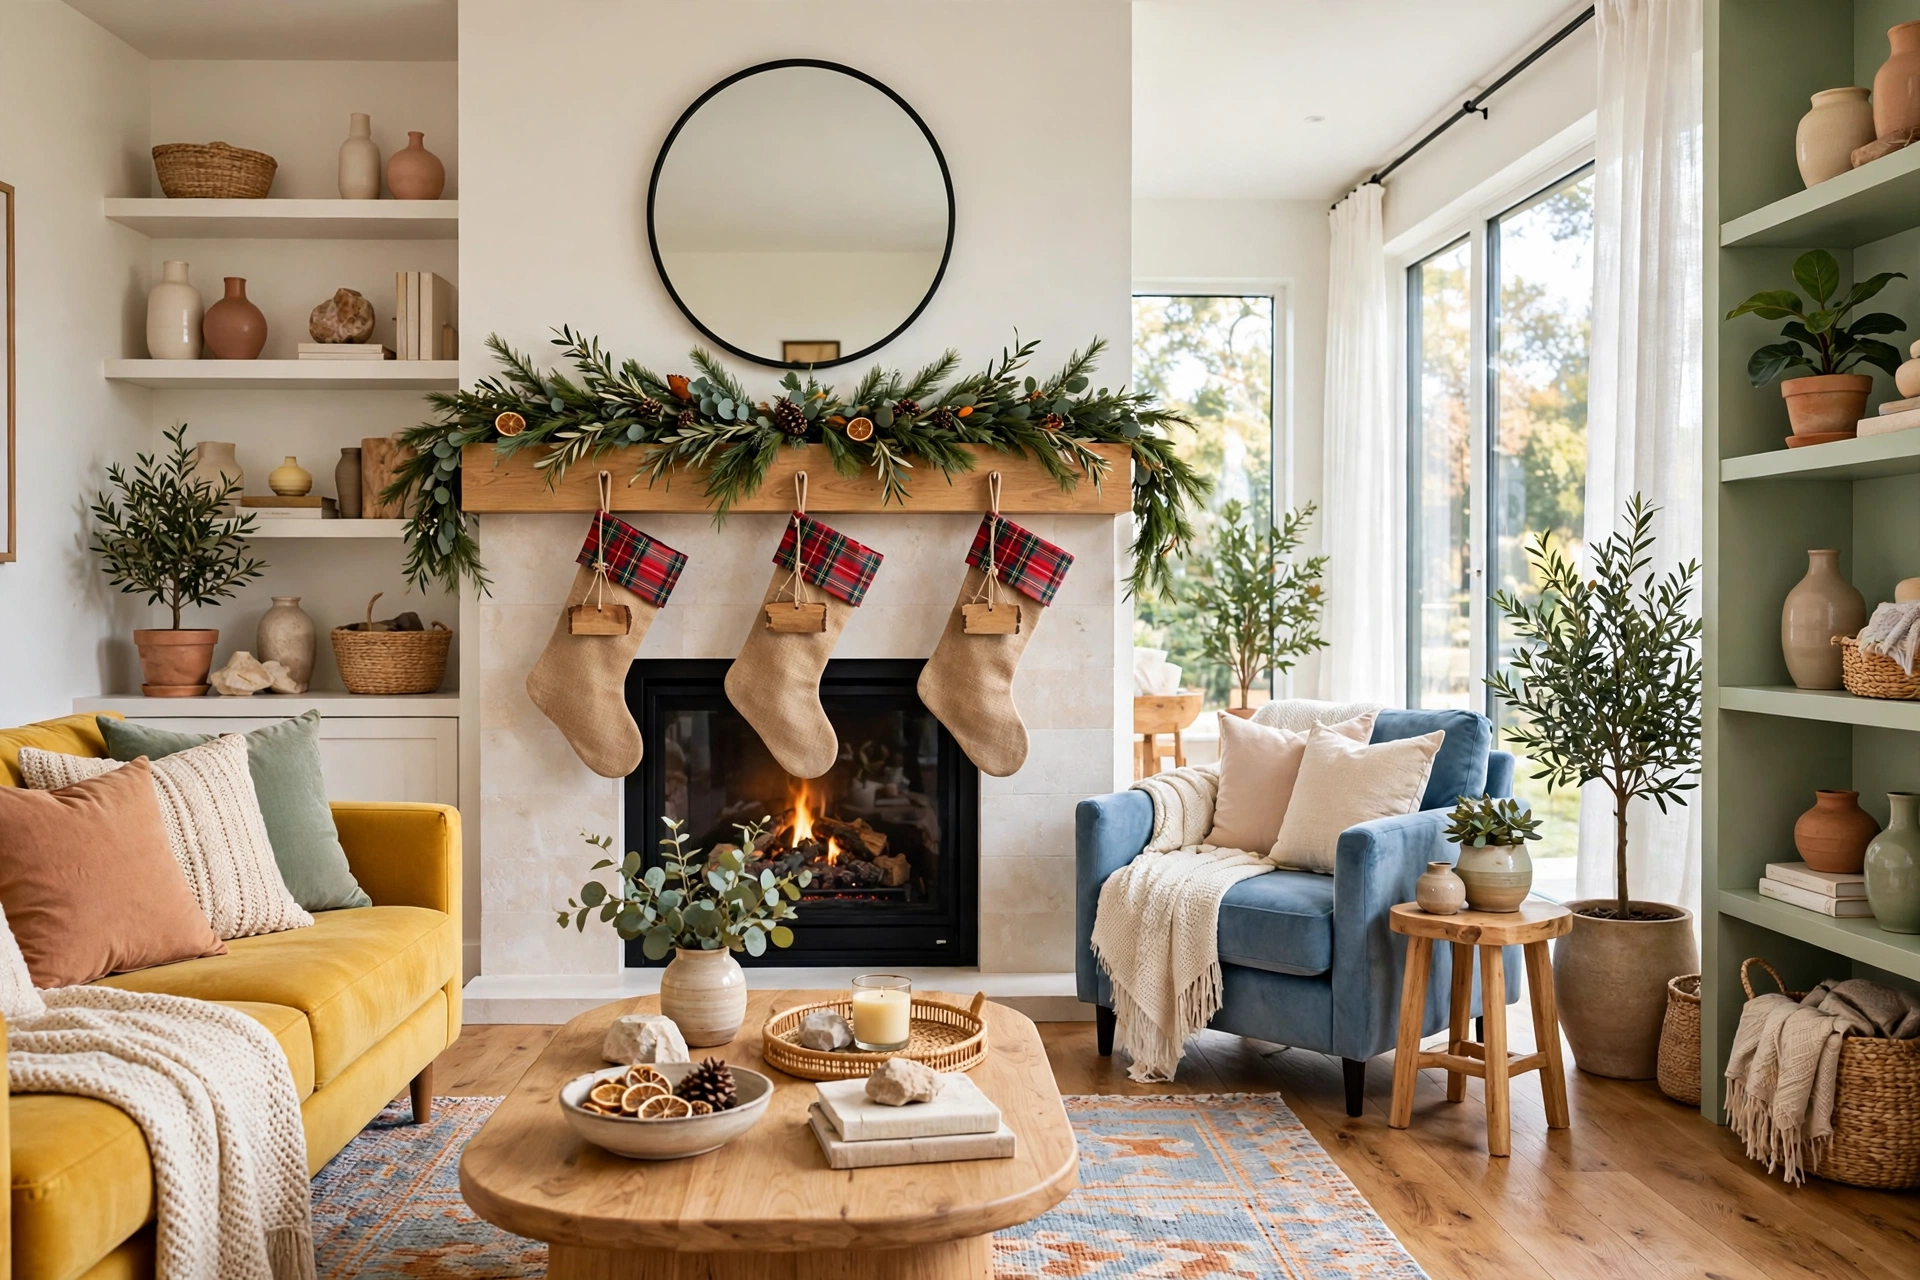
No-sew burlap stockings look rustic and expensive, and they need no machine and no needle. Fold a length of burlap in half, trace a stocking shape, and cut through both layers. Glue the edges together with fabric glue or hot glue, leaving the top open, and fold a wide cuff of plaid fabric or faux fur over the opening. Add a loop of twine for hanging and a small wooden name tag, and the stocking is ready for the mantel.
Burlap frays, so seal the cut edges with a thin line of clear craft glue or a quick pass with a lighter held at a safe distance — or embrace the fray as part of the rustic look and trim it neatly instead. Make one stocking per person and hang them in a row with matching name tags, and the mantel suddenly looks like a storybook. If you want more wall-hanging ideas for the season, the DIY wall decor ideas guide has more handmade pieces that suit every room.
⚠️ Warning: Hot glue and burlap can burn fingers fast — keep a bowl of cold water nearby, work on a heat-proof surface, and let children decorate the finished stockings rather than handle the glue gun.
13. Pine Branch and Fairy Light Mantel

A pine branch mantel is the classic holiday look, and the handmade version beats the store-bought one because you control the fullness. Lay fresh pine branches along the mantel in overlapping layers, securing them with green florist wire, then weave a string of warm-white battery fairy lights through the branches, hiding the battery pack behind a stack of books or a vase. Tuck in pinecones, dried orange slices, and a few sprigs of holly for colour.
Fresh branches last about two weeks indoors if you mist them lightly every couple of days, so build this mantel in mid-December rather than at the start of the month. For a longer-lasting version, use high-quality faux branches — the good ones are indistinguishable from across the room and survive year after year. Either way, keep the lights on a timer so the mantel glows every evening without you having to remember the switch.
14. Salt Dough Ornaments for the Tree

Salt dough ornaments are the cheapest ornaments you will ever make, and they carry more meaning than anything from a shop. Mix two cups of flour, one cup of salt, and one cup of water into a firm dough, roll it out, and cut stars, trees, and circles with cookie cutters. Poke a hole near the top of each shape with a straw, bake at a low oven until hard, then paint them white, gold, or deep red and thread ribbon through the holes.
Let children press handprints or fingerprints into the dough before baking — the finished ornaments become keepsakes that come out of the box every year. Seal the painted ornaments with a coat of clear varnish so they survive handling and humidity, and store them wrapped in tissue. One batch of dough makes twenty or more ornaments, so there are plenty to give away as well as hang on your own tree.
15. Chalkboard Holiday Countdown Sign

A chalkboard countdown sign turns the wait for the holidays into a daily ritual. Paint a small wooden board or an old picture frame’s backing with chalkboard paint, prop it on an entryway console or hang it in the kitchen, and write the number of days left in large chalk numerals, with a small festive drawing underneath. Update the number each morning, and the whole family gets a little moment of anticipation with breakfast.
Use a chalk marker rather than regular chalk for the main number — it stays crisp and does not smudge when someone brushes past — and keep a damp cloth nearby for the daily wipe. This is the simplest project in the guide, taking under thirty minutes including drying time, and it is the one that gets used every single day. If you are short on wall space, the sign also works propped on a shelf between two candle holders, and it pairs perfectly with the pine branch mantel from idea thirteen.
Common DIY Holiday Decor Mistakes
Mistake 1: Starting too many projects at once
The most common way an afternoon of crafting ends in frustration is starting five projects and finishing none. Pick one project, gather its supplies, and finish it completely — hang it, photograph it, enjoy it — before touching the next one. A single finished garland on the mantel does more for a room than a table full of half-finished crafts.
Mistake 2: Using real flames inside jars and wreaths
Real candles inside mason jars, wreaths, and anything made of paper or dried greenery are a fire risk, and no decoration is worth it. Battery tea lights and fairy lights give the same warm glow with none of the danger, and they can stay lit all evening without supervision. Save real candles for sturdy holders on a clear, stable surface.
Mistake 3: Buying supplies project by project
Buying a fresh set of supplies for every project wastes money and time, because most holiday crafts share the same basics: twine, ribbon, glue, cinnamon, and dried oranges. Buy those staples in bulk once at the start of December, and each individual project costs only a few dollars. Your future self, halfway through project eight, will be grateful.
Mistake 4: Decorating only the living room
Holiday cheer that stops at the living room door feels half-finished, because the rooms you actually live in — the kitchen, the hallway, the bedroom — stay bare. Spread the projects around: a paper star lantern in the bedroom, a chalkboard countdown in the kitchen, a staircase garland in the hallway. A little decoration in every room makes the whole house feel festive.
Mistake 5: Forgetting to check scale before hanging
A garland that is too short for the mantel, a tree that is too small for the wall, a wreath that disappears on a big door — scale mistakes make good crafts look wrong. Measure the space before you start, and hold the finished piece up in place before you commit to hooks or nails. When in doubt, make it bigger than you think: holiday decor reads best when it is generous.
Frequently Asked Questions
1. How much should I budget for DIY holiday decor?
Most of the projects in this guide cost under thirty dollars each, and many cost under ten once you have the shared staples. Buying twine, ribbon, cinnamon, and glue in bulk at the start of the season keeps every individual project cheap, and using free materials like pinecones and branches brings the cost down further.
2. Can beginners really make these holiday decorations?
Yes — every project here is rated beginner or intermediate, and none needs special skills or expensive tools. The simplest ones, like the cinnamon candle holders and the paper snowflakes, take under thirty minutes and are genuinely hard to get wrong. Start with one of those, and your confidence will carry you through the rest.
3. How far in advance should I make DIY holiday decor?
Dried orange garlands, salt dough ornaments, and simmer pot jars keep for weeks, so make those early in December. Fresh greenery projects like the pine mantel last about two weeks indoors, so build those in mid-December. Cranberry table runners should be made the morning of the dinner they are for.
4. Are these DIY holiday decor ideas safe around children and pets?
Mostly yes, with two rules: use battery candles instead of real flames, and keep small items like beads and ornaments out of reach of toddlers and pets. The felt ornament tree and the paper snowflakes are the safest projects for households with small children, and they are also the most fun to make together.
5. What supplies do I need to start?
Scissors, a glue gun, twine, ribbon, a drop cloth, and a few mason jars cover most of the list. Add cinnamon sticks, dried orange slices, pinecones, and battery tea lights, and you can make nearly every project in this guide from one shopping trip. Check the fall DIY home decor projects guide for more seasonal crafts that use the same supplies.
6. Can I make these decorations in a small apartment?
Absolutely — small spaces are where handmade decor shines, because every piece is made to fit exactly where it goes. The washi tape wall art, the paper star lanterns, and the mason jar luminaries all work beautifully in small rooms, and the guide to decorate a small apartment for the holidays without clutter has more small-space strategies.
7. How do I store DIY holiday decorations for next year?
Wrap fragile pieces in tissue, store garlands loosely coiled in a box rather than folded tight, and keep everything in one labelled container. Salt dough ornaments and dried orange garlands keep well if they stay dry, while fresh greenery projects should be composted and remade next year.
Conclusion
Fifteen projects, one afternoon each at most, and a home that feels genuinely festive — that is the promise of these DIY holiday decor ideas. The beauty of making your own decorations is not just the money saved, though that is real; it is that every piece carries a memory of the afternoon you made it, and every year when it comes out of the box, the memory comes with it. Start with the quickest win — the cinnamon candles or the paper snowflakes — and let the momentum carry you through the rest of the list.
When the last garland is hung and the candles are lit, step back and look at the rooms as a guest would see them. The glow on the mantel, the scent of cinnamon in the air, the paper stars catching the light — none of it came from a shop, and all of it cost less than a single store-bought decoration. That is the real magic of a handmade holiday: the house does not just look festive, it feels like yours.