15 Pantry Organization Ideas That Make You Actually Want to Cook
Introduction
A messy pantry does more damage than a messy drawer, because it greets you every single time you cook. You open the door looking for cumin and find three half-empty bags of rice, a sauce bottle that expired last year, and a spice jar buried behind the cereal boxes. Dinner starts with frustration, so it is no wonder that cooking starts to feel like a chore. The pantry is not just storage; it is the starting line of every meal, and when it is chaotic, every meal feels harder than it needs to be.
The good news is that pantry organization ideas do not require a renovation, a walk-in pantry, or a big budget. Most of the ideas in this guide cost little, take an afternoon or less, and work in any pantry shape, from a deep closet with shelves to a single narrow cabinet. Like the best small kitchen decor ideas, they balance beauty with everyday function, so the system survives real cooking instead of falling apart on the first busy weeknight.
Below are fifteen pantry organization ideas that actually make you want to cook, from the full reset that starts everything to the five-minute weekly habit that keeps it all working. Pick the three or four that solve your pantry’s worst problem — invisible back rows, snack chaos, or food you keep buying twice — and start there. A pantry you can see into is a pantry you will love using every single day.
1. Start With a Full Pantry Reset

Every good pantry starts the same way: take everything out. Empty each shelf completely, wipe the shelves down, and sort everything into groups on the kitchen table — grains, canned goods, baking, snacks, sauces, and spices. A full reset shows you exactly what you own, which is usually more than you thought, and it exposes the duplicates, the expired jars, and the mystery bags with no labels that have been quietly taking up space for months.
Be ruthless during the sort, because a pantry system built around things you never use will fail within weeks. Toss anything expired, donate sealed extras you will not cook with, and combine half-empty duplicates into one container. Once only the keepers go back in, every shelf has breathing room, and every later idea in this guide works better, because you are organizing food you actually eat rather than storing clutter more neatly.
2. Use Clear Bins You Can Actually See Through

Clear bins are the single highest-impact pantry purchase, because they turn a shelf of loose bags and boxes into a set of visible zones. When you can see the pasta, the rice, and the snack bars without pulling anything out, you stop buying duplicates and you stop letting food expire in the back row. Choose bins with straight sides and handles, so they slide out like drawers, and measure your shelf depth first so the bin does not stick out past the shelf edge.
Group each bin by category rather than by brand or size: one bin for breakfast foods, one for pasta and grains, one for baking supplies, one for snacks. Keep the bins to one category each, because a bin labelled “miscellaneous” becomes a junk drawer within a month. Clear bins also make restocking effortless, since one glance tells you what is running low before you write the shopping list.
3. Label Everything, Even the Obvious Stuff
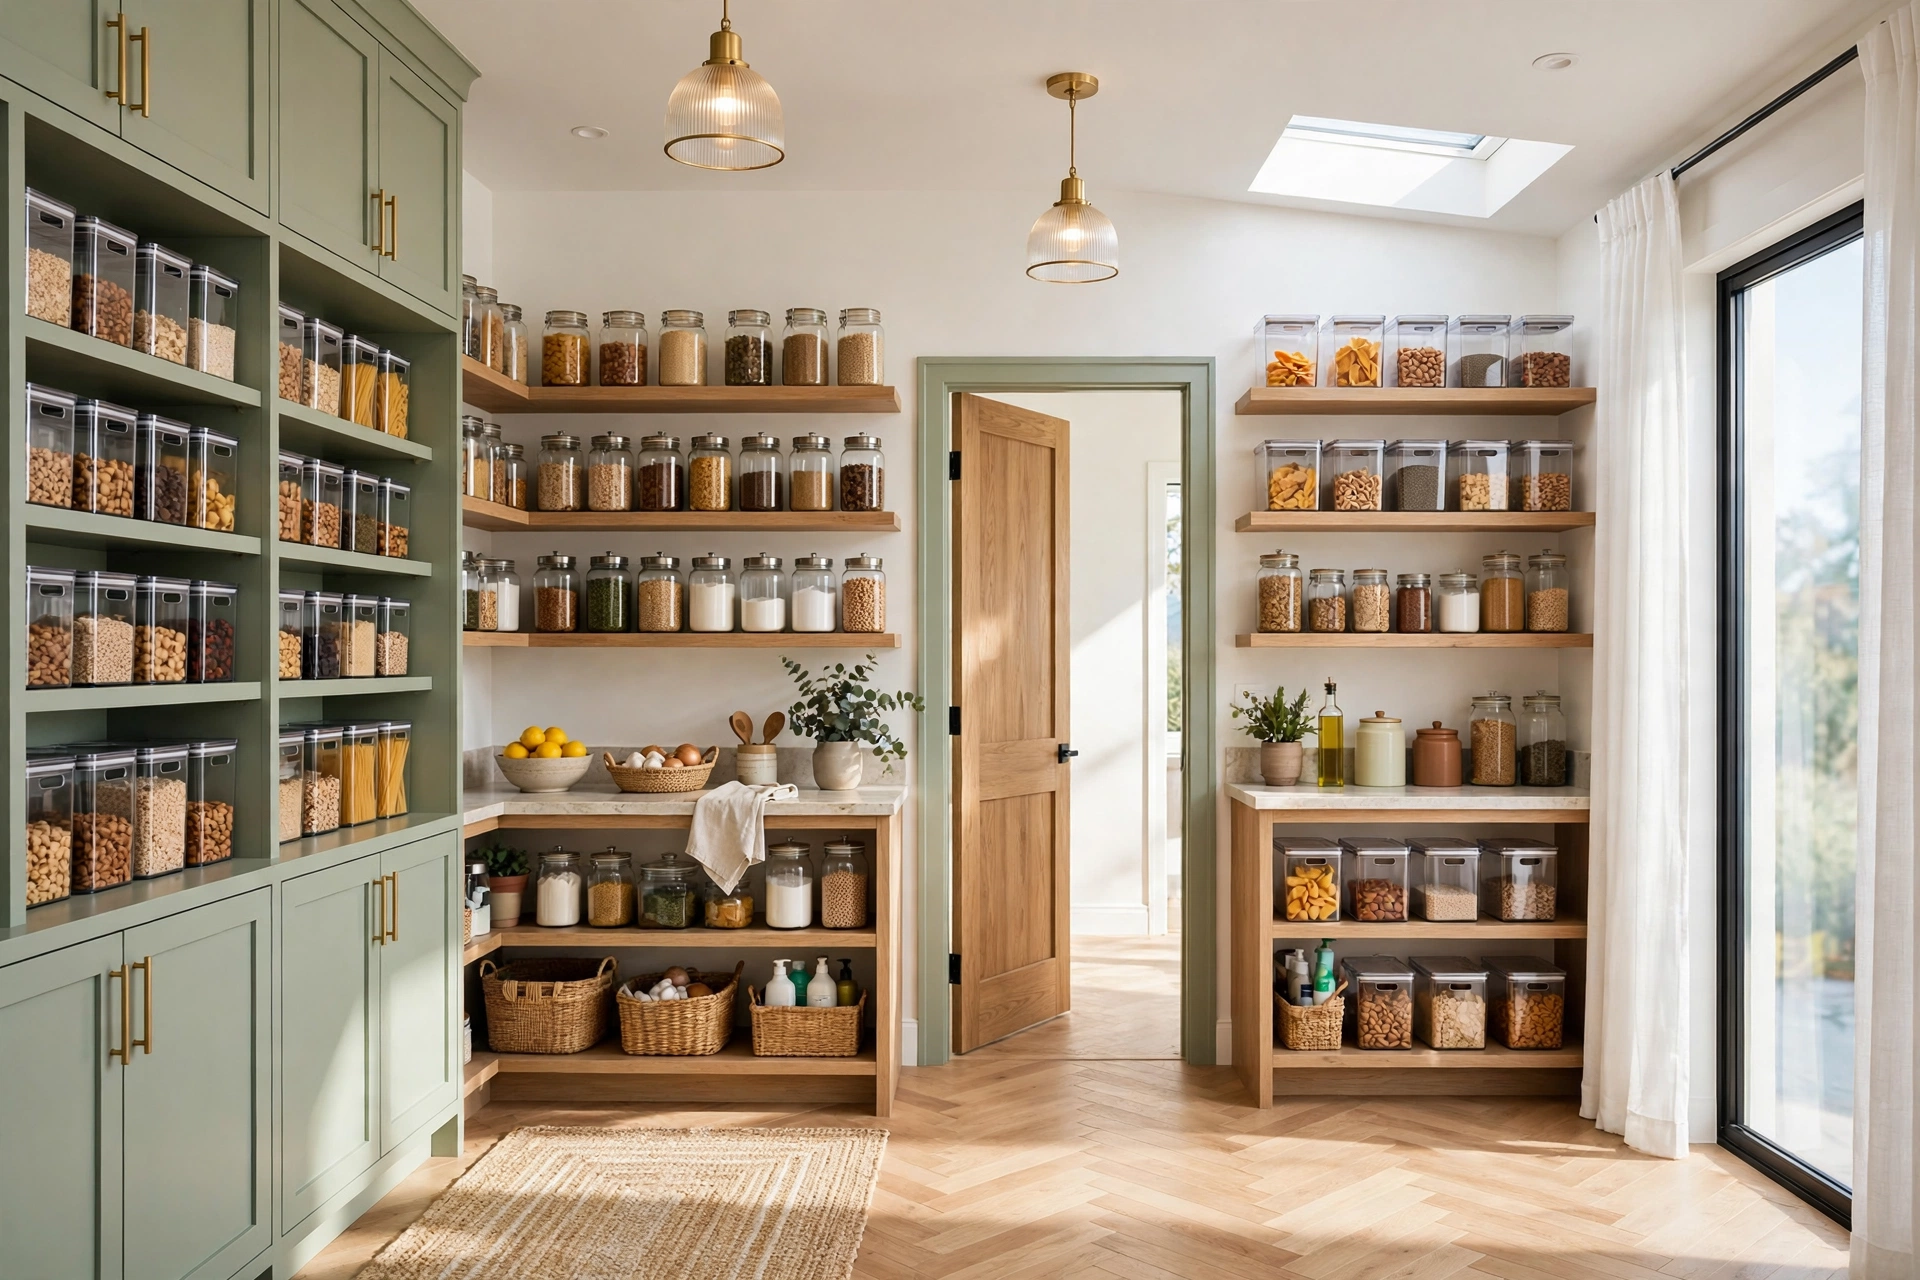
Labels feel unnecessary until the third person in the house puts the flour in the sugar’s spot. A label on every bin, jar, and basket tells everyone in the household where things belong, which is what keeps the system alive after the first week. Use a label maker, chalk labels, or simple adhesive labels, and put the label on the side that faces out, at eye level, so it can be read without pulling the bin off the shelf.
Keep labels specific enough to be useful: “Pasta and Rice” beats “Food”, and “Kids’ Snacks” beats “Snacks” when two snack bins exist. For decanted jars, label both the contents and the cooking note if it matters, such as “Basmati Rice — rinses well” or “Bread Flour”. Labels are cheap, they take minutes to make, and they are the difference between a pantry that stays organized and one that drifts back to chaos.
Pantry Organization Quick-Start Checklist
- ✅ Empty the pantry completely and toss expired or duplicate food first
- ✅ Sort everything into categories before buying a single bin or jar
- ✅ Use clear bins with handles, one category per bin
- ✅ Label every bin and jar on the side that faces out
- ✅ Zone shelves by how you cook, with daily foods at eye level
- ✅ Add one “use first” bin so nothing quietly expires
- ✅ Do a five-minute reset once a week to keep the system alive
4. Decant Staples Into Matching Airtight Jars

Few changes make a pantry look instantly more expensive than decanting. A jumble of half-empty bags, torn boxes, and mismatched packets reads as chaos, while a row of clear, matching jars reads as a pantry that belongs in a magazine, and it is also far more practical. You can see at a glance what is running low, ingredients stay fresher in sealed jars, and pouring from a jar is easier than wrestling with a torn bag mid-recipe.
Start with the five things you reach for most: flour, sugar, rice, pasta, and oats, then add coffee, lentils, and baking supplies as the habit sticks. Square jars waste less shelf space than round ones, which matters a lot on a narrow pantry shelf, and airtight lids protect against pantry moths and humidity. Keep the jars on the shelf where you actually cook rather than in a high cabinet you never open, and label every jar the day you fill it, not later, because later rarely comes.
💡 Pro Tip: Decant only what you use regularly. Rarely used specialty flours and grains are fine staying in their original bags, clipped shut, in a single “baking extras” bin — decanting everything is a weekend project that burns you out before the system even starts.
5. Zone Your Pantry by How You Cook

Organizing by food category is a good start, but organizing by cooking routine is what makes a pantry feel effortless. Instead of grouping all cans together and all grains together, create zones that match real meals: a breakfast zone with oats, cereal, honey, and coffee; a weeknight dinner zone with pasta, sauces, and canned tomatoes; a baking zone with flour, sugar, and chocolate chips. When you cook, you pull from one zone instead of hunting across five shelves.
Put the zones you use daily at eye level and waist height, and move rarely used zones, like holiday baking or bulk backups, to the highest and lowest shelves. Keep heavy items low so shelves stay safe and easy to reach, and keep the zones consistent: if pasta lives in the dinner zone, it always lives there, even when you are in a hurry. A pantry zoned by routine is a pantry that practically cooks alongside you.
Quick Comparison: Pantry Organization by Cost and Effort
6. Add Tiered Risers for Canned Goods

Canned goods are the worst pantry offenders, because a single row hides two more rows behind it, and you end up buying tomato sauce you already own. Tiered risers fix the exact problem: each row of cans sits one step higher than the row in front, like stadium seating, so every label is visible from the front of the shelf. A simple three-tier riser turns a blind wall of cans into a display you can actually shop from.
Measure your shelf height before buying, since tall cans need taller steps, and keep one riser per category: soups on one, tomatoes and beans on another, coconut milk and broth on a third. Heavy cans belong on the lowest step and on the lowest shelf for safety. Risers are inexpensive, need no installation, and they pay for themselves the first time you stop buying a duplicate can.
7. Hang a Door Rack for the Small Stuff

The inside of the pantry door is free real estate, and it is perfect for the small items that get lost on shelves: spice jars, sauce packets, measuring cups, and snack bars. A slim over-door rack or a set of adhesive-mounted baskets turns that dead surface into a full extra shelf, with zero drilling in most cases. These no-drill storage ideas are especially kind to renters, since the rack lifts off at move-out and leaves no trace.
Check the fit before you buy: measure the gap between the door top and the frame, and choose a rack shallow enough that the door still closes without scraping the shelves. Keep heavy items low on the rack and light items high, so the door swings freely and the hinges stay happy. A door rack is also the best home for the things you grab while cooking with one hand, like spices and oils, because they sit at eye level the moment the door opens.
📌 Important: Never hang heavy bottles or large jars on a pantry door rack. A door loaded heavily on one side strains its hinges over time and can stop latching properly. Keep door storage to small, light items and leave the heavy lifting to the shelves.
8. Use Lazy Susans in Deep Corners

Deep pantry shelves and corner cabinets are where food goes to be forgotten, because reaching the back means moving everything in front. A lazy susan solves it with one spin: a round turntable that brings the back row to the front without unpacking the shelf. Use one for oils and vinegars, one for sauces and condiments, and one for vitamins or small baking supplies that otherwise scatter.
Choose a turntable with a raised rim or a non-slip surface so bottles do not slide off mid-spin, and size it to the shelf with a little clearance on each side so it turns freely. Lazy susans work best for groups of similar-sized items; mixing tall oil bottles with tiny spice jars on one turntable wastes the space. In a corner pantry, a full round turntable is the single purchase that most reduces food waste, because nothing hides in the dark anymore.
9. Build a Snack Basket System

Snacks destroy pantry order faster than any other category, because everyone in the house grabs from them daily and nobody puts them back neatly. A basket system fixes it by giving snacks hard boundaries: one basket for kids’ snacks, one for adult snacks, one for after-school or lunchbox snacks. When a basket is full, no more snacks go in; when it is empty, it is time to restock, which makes the shopping list write itself.
Use open baskets or bins that are easy to carry to the table, and keep the snack baskets on a low, reachable shelf so kids can help themselves without climbing. Portion large bags into smaller bags or containers inside the basket, so one open bag does not go stale while three more wait behind it. The basket system also ends the nightly “there is nothing to eat” complaint, because the snacks are visible, contained, and always in the same place.
10. Keep a “Use First” Bin to Cut Food Waste

Every pantry has a quiet corner where food expires: the half-used bag of lentils, the sauce bought for one recipe, the crackers from last month. A “use first” bin stops that waste by giving those items a visible home at the front of the pantry. Whenever you open a package, find a nearly empty jar, or buy something for a single recipe, it goes in the use-first bin, and the household cooks from that bin before opening anything new.
Keep the bin small and at eye level, so it is impossible to ignore, and review it when planning meals each week. A use-first bin also saves real money, because the average household throws away a surprising amount of pantry food that simply got forgotten. Pair it with a quick expiry check once a month, and your pantry stops being a place where food quietly dies.
💡 Pro Tip: Put the use-first bin at the front of your most-used shelf, not tucked on a side shelf where it becomes another forgotten zone. A use-first bin only works if you see it every time you open the pantry door.
11. Store Baking Supplies as One Kit

Baking supplies scatter across a pantry like nothing else: flour on one shelf, sugar on another, baking powder behind the oils, chocolate chips lost in the snack zone. Storing them as one kit changes baking from a treasure hunt into a ten-minute setup. Gather flour, sugar, baking powder, baking soda, vanilla, cocoa, and chocolate chips into one large bin or basket, and when you bake, you carry the whole kit to the counter in one trip.
Keep the kit on a middle shelf where it is easy to lift down, and label it clearly so nobody borrows the vanilla for another zone. A baking kit also makes it obvious when a staple is running low, because the whole kit gets checked at once instead of discovering mid-recipe that the baking powder is empty. If you bake rarely, a smaller kit with just the basics keeps the idea without claiming a whole shelf.
12. Add Pull-Out Drawers or Slide-Out Bins

If your pantry has deep shelves, pull-out drawers or slide-out bins are the upgrade that changes everything. Instead of reaching into a dark cabinet and moving five items to reach the sixth, you pull the whole shelf toward you and see everything at once. Slide-out bins are inexpensive, need no permanent installation in most cases, and they turn deep pantry shelves into drawers that actually work.
Measure the shelf width and depth carefully, and leave a little clearance on each side so the bin slides freely even when full. Keep heavy items in the lowest pull-outs and lighter items higher, and resist the urge to fill a pull-out to the brim, since an overstuffed drawer is just a deep shelf with extra steps. This is the same space-saving thinking behind the best multi-functional furniture, applied inside the pantry: one change that makes the whole room work harder.
13. Group by Meal, Not Just by Category

Category grouping is logical, but meal grouping is faster. A taco-night bin with tortillas, beans, salsa, and seasoning, or a pasta-night bin with pasta, sauce, and parmesan, means dinner prep starts with grabbing one bin instead of visiting five shelves. Meal bins work especially well for the three or four meals your household cooks on rotation, because those are the meals where speed matters most on a busy weeknight.
Keep meal bins to genuine rotations, not aspirational ones: if you cook tacos twice a month, a taco bin earns its shelf; if you made curry once last year, it does not. Label meal bins with the meal name, not the contents, so anyone in the house can find “Pasta Night” without knowing what goes in it. Meal grouping is the pantry idea that most directly answers the question “what is for dinner”, because the answer is sitting in a bin, ready to go.
14. Keep Countertop Overflow in Check With a Landing Zone

Pantry overflow always lands on the kitchen counter, and a cluttered counter makes the whole kitchen feel chaotic, which is why pantry organization and kitchen counter decor are really the same project. A landing zone fixes the spillover: one tray, basket, or small shelf near the pantry where overflow lives on purpose instead of spreading across every counter. New groceries go to the landing zone first, get sorted into the pantry, and the tray empties again.
Keep the landing zone small, because a big one becomes a second pantry on the counter, and empty it the same day groceries arrive so it never becomes permanent storage. A landing zone also protects your prep space: when the counter has a designated spot for incoming food, the rest of the counter stays clear for actual cooking. Think of it as the pantry’s front door, a small, tidy place where food pauses before it finds its real home.
⚠️ Warning: Never let the landing zone hold perishables overnight. Fresh food left on a counter tray spoils fast and attracts pests. Perishables go straight to the fridge or freezer, and only shelf-stable pantry food ever waits in the landing zone.
15. Do a Five-Minute Weekly Pantry Reset

The best pantry system in the world fails without maintenance, and the maintenance is smaller than you think: five minutes, once a week. Pick one day, open the pantry, toss anything expired, move use-first items to the front, wipe one shelf if it needs it, and put back anything that drifted to the wrong zone. Five minutes weekly beats a three-hour overhaul every six months, because the pantry never gets bad enough to dread fixing.
Tie the reset to something you already do, like writing the shopping list or unpacking groceries, so it becomes a habit instead of a chore. Keep a small trash bag and a cloth near the pantry on reset day, and involve the household: the person who cooks least often is often the best resetter, because they see the drift with fresh eyes. A pantry that gets five minutes a week stays a pantry you love cooking from, year after year.
Common Pantry Organization Mistakes
Mistake 1: Buying Containers Before Sorting
The most common pantry mistake is buying a beautiful set of matching containers before knowing what you actually own. The bins end up the wrong size, the wrong number, or the wrong shape for your shelves, and the system fails before it starts. Sort first, measure second, buy last, and you will buy half as many containers and love all of them.
Mistake 2: Organizing by Looks Instead of by Use
A pantry that photographs beautifully but hides daily food behind decorative jars will not survive a week of real cooking. Put the food you use daily at eye level and within easy reach, even if it is less pretty, and save the beautiful display for the top shelf. A pantry is a working room first and a photo second.
Mistake 3: Creating a “Miscellaneous” Bin
A miscellaneous bin feels like a solution, but it is a junk drawer with a nicer name. Within a month it holds batteries, rubber bands, and three sauces nobody can identify. Every item needs a real category or a real decision: keep it in a proper zone, or let it go. If you cannot name the bin’s category in two words, it is not a category.
Mistake 4: Forgetting That Other People Use the Pantry
A system only you understand will collapse the moment someone else puts groceries away. Labels, simple zones, and one clear home per item are what make a pantry survive a household. If a guest could not put the pasta away correctly without asking, the system is too clever for its own good.
Mistake 5: Skipping the Weekly Reset
Even the best system drifts: a new product arrives, a bin gets overfilled, a jar migrates to the wrong shelf. Skipping the five-minute weekly reset lets small drift become a full relapse, and suddenly the pantry needs another overhaul. The reset is the cheapest insurance your pantry will ever have, and it takes less time than scrolling through recipes.
Frequently Asked Questions
1. How do I organize a small pantry with no extra space?
Start with the free moves: a full reset, tossing expired food, and zoning by cooking routine, which cost nothing and often free up a whole shelf. Then add the cheapest high-impact tools, like clear bins and a door rack, before considering bigger changes. Small pantries reward editing more than buying, because every item you remove is space you gain.
2. Should I decant everything into matching jars?
No, decant only the staples you use weekly, like flour, sugar, rice, and oats. Rarely used items are fine in their original packaging inside a labelled bin. Decanting everything is expensive, time-consuming, and creates extra washing up, which is the opposite of what an organized pantry should do.
3. What is the best way to organize canned goods?
Use tiered risers so every can label is visible, group cans by category on one riser each, and keep a use-first bin for cans nearing their dates. Store heavy cans low and never stack cans more than two high without a riser, since tall stacks topple and hide what is underneath.
4. How do I keep my pantry organized with kids in the house?
Give snacks their own basket on a low shelf, label it clearly, and let kids choose from that basket only. When the basket empties, it is restock time, which teaches portion awareness and stops snack sprawl. Keep adult-only items, like hot sauces and baking supplies, on higher shelves out of small hands’ reach.
5. How often should I clean out my pantry?
Do a five-minute reset weekly and a deeper check every three months, when you toss expired food, wipe shelves, and re-check zones. Seasonal deep cleans also catch the holiday baking supplies and summer barbecue sauces that drift out of season. A pantry checked quarterly never needs a dreaded full-day overhaul.
6. Are clear bins or opaque bins better for a pantry?
Clear bins win for everyday food, because you can see what is inside and what is running low without opening anything. Opaque bins suit only the categories you prefer to hide, like backup supplies or less attractive packaging, and they look calmer on open shelves. In a closed pantry, choose clear; on open shelving, mix both.
7. What should I do with food I will not use?
Donate sealed, in-date food to a local food bank, and compost or discard anything opened, stale, or expired. Many food banks accept pantry staples year-round, and donating clears space while helping someone else. Never donate expired food, and check the food bank’s current needs before dropping items off.
Conclusion
A pantry that works changes how cooking feels, because it removes the daily friction of hunting, digging, and second-guessing. You open the door, see what you have, grab what you need, and start cooking in a good mood instead of a frustrated one. The fifteen ideas in this guide are not about perfection; they are about building a system that fits your cooking, your household, and your space, and then keeping it alive with five minutes a week.
Start today with the free moves: empty the pantry, toss what is expired, and put daily food where you can see it. Then add one or two tools that solve your biggest frustration, whether that is clear bins, a door rack, or a use-first bin. A pantry you can see into is a pantry you will actually want to cook from, and dinner will taste better for it.